The lunch wraps are delicious, nutritious, and super simple to make! They’re also free from most allergens, which makes them even better. Great for spoonies, or anyone that is in a rush!
Today is probably the first day in over a year that I have actually made my own lunch! Usually, I just heat up leftovers and/or drink an Ensure. Sometimes I get crazy and add a few snack foods with my Ensure 😉 I know I need to eat, but it’s hard to come up with lunch foods that I like, are easy to make, and don’t kill my stomach… it’s even HARDER if I am actually following my rotation diet: yeast, beans, cheese, chocolate can only be eaten every three days (ie: I eat yeast Monday, I can’t eat it again until Thursday). Then, my best friend made these wraps for us during a girl day, and I’m hooked! This particular recipe is completely free from all my allergens. It can very easily be modified to fit your personal diet as well.

Ingredients
() denote exactly which type I used for my own wrap
- tortilla (Mission flour tortillas, large/burrito size)
- salad dressing (Kraft ranch dressing)
- lunch meat (Oscar Meyer rotisserie chicken, deli meat*)
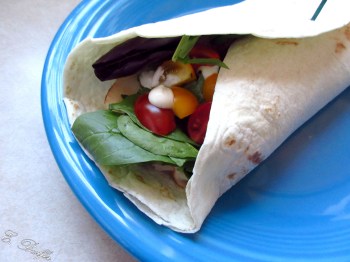
- salad mix, or other leafy greens (50/50 spring mix and spinach)
- tomatoes (Nature Sweet sunbursts and cherubs)
- Lay the tortilla on a plate. If the tortilla is stiff, heat it up a little until flexible (I do 15-20 seconds in the microwave).
- Spread a thin layer of the ranch dressing on the tortilla. The specific amount is up to your personal taste!
- Put down a layer of the lunch meat. I did a single overlapping layer, to keep it from overpowering the wrap. You can add more or less to taste.

- Put some of the salad mix on top of the lunch meat. Don’t use too much or it’ll prevent you from being able to taste all the rest of the tasty stuff (I used a little too much for the wrap I made while taking the photos). Lots of salad containers say they are pre-washed and ready to eat, but I like to rinse mine first, just to be safe. Try to distribute the leaves evenly so you have the same amount of salad in each bite!

- Wash and slice the tomatoes. For the pictured wrap, I used 4 of the sunbursts and 5 of the cherubs. Since the sunbursts are quite large, I quartered them. However, the cherubs were smaller, so I only halved them. Make sure you use a serrated knife, or you’ll just crush the tomatoes and loose all the delicious stuff! You just want to get them to bite size, they’re easier to eat that way.
- Evenly distribute the tomatoes over the salad mix.

- If you have accidentally put a ton of salad on your wrap, you can add more ranch dressing. (And if you love ranch, you might want to add a drizzle as well! Haha)
- Wrap up the tortilla and enjoy!
*While looking at the ingredients to write this post, I realized I’d forgotten to check the lunch meat prior to purchasing it! This particular lunch meat does contain “yeast extract,” unfortunately. For this to fully follow my elimination diet, I will need to use a different lunch meat… oops!
As I said earlier, this recipe is fantastic if you’re low on energy and/or time! It’s also a great way to get in a serving of vegetables (the tomatoes are nutritionally a vegetable, even though they’re technically a fruit), which I know a lot of us struggle with on a daily basis. I eat these with a side of fruit, making it a fully balanced meal. Yummy!
My best friend adds onions, bacon bits, and cheese into her wrap. Customizing your wrap is half the fun!
What ingredients did you put in your wrap?

These are so easy! I will have to pick up some gluten free wraps to make these.
LikeLike
Oh! That is an easy fix! Sounds delicious 🙂
LikeLike
This looks so yummy and easy. I will be putting this into my lunch rotation. Thank you for sharing. =)
LikeLike
You’re so welcome! I think they’re delicious 🙂 Let me know if you end up adding/changing anything! I want to know how people personalize them.
LikeLike